LegsTheHorse (talk | contribs) (Overhaul of the article, explaining the battle rounds more clearly, as well as adding a section about the tier system. Not necessary, but I guess it's nice to have for anyone looking for a brief summary on how it works.) Tags: Visual edit apiedit |
No edit summary |
||
| (42 intermediate revisions by 19 users not shown) | |||
| Line 1: | Line 1: | ||
| ⚫ | |||
{{Cog |
{{Cog |
||
|type = Bossbots |
|type = Bossbots |
||
|cog name = Chief Executive Officer |
|cog name = Chief Executive Officer |
||
| − | |image = |
+ | |image = Boss-bossbot-chiefexecutiveofficer.png |
|precede = [[The Big Cheese]] |
|precede = [[The Big Cheese]] |
||
|succeed = [[The Chairman]] |
|succeed = [[The Chairman]] |
||
| + | |numberofattacks = 4 |
||
| ⚫ | |||
| + | |lowdamage = 15 |
||
| + | |highdamage = 30 |
||
| ⚫ | |||
|succeedimage = CogsTEMPLATE.png |
|succeedimage = CogsTEMPLATE.png |
||
}} |
}} |
||
| ⚫ | |||
| − | The '''Chief Executive Officer''', commonly |
+ | The '''Chief Executive Officer''', more commonly known as the '''C.E.O.''', is the boss of the [[Bossbots]]. He resides within the [[Bossbot Clubhouse]] at [[Bossbot Headquarters]]. |
==Appearance== |
==Appearance== |
||
| − | The |
+ | The C.E.O. possesses a [[Skelecog]]-like head and is dressed in a golfer's attire that seems to be bolted to his body. Like the [[Vice President]] and the [[Chief Financial Officer]], he sits on a gear-shaped podium and has an undercarriage (except his never seems to open). He has two sets of eyes and teeth on the left side and on the right side, which is hard to see since he does not have an actual head. Instead, light bulbs and jaws stick out of his neck, some of which resemble golfing clubs. |
==Battle== |
==Battle== |
||
| ⚫ | The C.E.O. boss battle begins with the introduction of [[Good ol' Gil Giggles]], who explains to the incoming [[Toons]] that the C.E.O. is hosting a banquet at the time of their arrival, and that the banquet needs to be infiltrated. To do so, however, Toons are in need of waiter suits. Good ol' Gil Giggles explains that Toons need to collect waiter suit parts by defeating the Cogs. |
||
| ⚫ | |||
| ⚫ | The |
||
| − | === |
+ | ===First round: Waiter Cog battle=== |
| − | + | The first round consists of waiter-suited [[Version 2.0 Cogs]]; every Cog fought in this battle (with the exception of the C.E.O. himself) is a Version 2.0 Cog. The Toons in the battle face off against thirty Cogs collectively, with two separate groups of four Toons contributing to the amount of Cogs defeated. The Cogs in this round range from [[Level 9 Cogs|level 9]] to [[Level 12 Cogs|level 12]], so Cogs in the round can spawn as either a [[Downsizer]], a [[Head Hunter]], a [[Corporate Raider]], or a [[The Big Cheese|Big Cheese]]. |
|
| − | Assuming |
+ | Assuming every participating Toon is in possession of [[Sound]], a good strategy to follow in this round is to allow each individual Toon of the group to use one [[Foghorn]] combined with three [[Elephant Trunk]]s being used by the other Toons. The Toon that starts off with a Foghorn at the beginning of the battle is usually on the far left of the player's computer screen, and then continue from left to right. This is good for preserving Sound, as Toons will run out of Sound very quickly if they use 2 or 3 Foghorns (depending on the level of Cogs they are facing). Once all of the Cogs are defeated, the Toons merge into their waiter suits. The C.E.O. comes in from the banquet room and tells the Toons to get a move on. The Toons then move into the banquet room, and the second round begins. |
| − | === |
+ | ===Second round: Feeding=== |
| + | [[File:Oil can.png|thumb|Oil can]] |
||
| − | The second round consists of a large banquet room with tables in which Cogs are seated. The Cogs seated at these tables can either be |
+ | The second round consists of a large banquet room with tables in which Cogs are seated. The Cogs seated at these tables can either be Corporate Raiders or Big Cheeses, depending on the Toons' [[Bossbot Cog Disguise]]s (see section "[[Chief Executive Officer#Tier system|Tier system]]"). Toons are given 300 seconds (five minutes) to defeat all of the Cogs that are seated. To do this, Toons must pick up oil cans carried into the room by conveyor belts that are at the side. These oil cans are supplied by Good ol' Gil Giggles, and will cause a Cog to explode after successfully eating three oil cans. Toons pick the oil cans up by bumping into them whilst they are on the conveyor belt. Then, they are given to the Cog by bumping into any seated Cog that isn't currently eating. An oil can icon appears above a Cog's head to signify their current state of eating, along with a dark line indicating how close they are to finishing. |
| − | Once a Cog finishes eating |
+ | Once a Cog finishes eating an oil can, they will become hungry once more. When a Cog is hungry, a pink stomach icon will appear above their head, with a dark line indicating how close they are to becoming enraged, as well as the Cog waving their hand in the air. If they are not fed in time, they will become enraged. When they are enraged, they will require another three oil cans to destroy them, regardless of how many oil cans they were fed before. An angry Cog can be distinguished by the yellow lightning bolt above their forehead, as well as the Cog visibly pounding the table in frustration. When a Cog has successfully been fed enough times, they will leap into the air and explode, like they normally do in a battle. Regardless of whether all Cogs were destroyed or not, this round will automatically end once five minutes have passed, starting the third round. |
| − | === |
+ | ===Third round: Banquet battle=== |
| − | The length of the banquet battle depends on how many Cogs are left over from the feeding round. The round starts with both groups facing off against a single |
+ | The length of the banquet battle depends on how many Cogs are left over from the feeding round. The round starts with both groups facing off against a single level 12 Version 2.0 Big Cheese. Once this Cog is defeated, two things may occur; if all Cogs were destroyed in the feeding round, the fourth round will begin instantly. If there are still Cogs remaining from the feeding round, they will fly in, and Toons will have to battle them as well. This puts more emphasis on taking out Cogs as quickly as possible in the feeding round, as Toons will be short on gags by this point, making this round tougher to deal with without the aid of restock [[SOS Toons|SOS cards]] and [[unite]]s. Once all Cogs defeated, the fourth round will then begin. |
| − | === |
+ | ===Fourth round: C.E.O. battle=== |
| − | The final round consists of the battle against the C.E.O. himself, |
+ | The final round consists of the battle against the C.E.O. himself, who insists that he needs to fight for himself if he wants a job done. The Toons battle against the C.E.O. with use of seltzer bottles placed on the tables that Cogs were once seated at. If a Toon runs into a table, they will jump onto it, unless it is already occupied by another Toon, or is flattened due to the C.E.O. running over it. When on a table, holding control will build up the power of the seltzer bottle. |
| − | The seltzer bottle has three charges; low, medium and high. Low charge is indicated by the bar at the bottom being a light blue. When hit by a low charge, the C.E.O. will only take 2 points of damage. When the bar is yellow, the charge is medium. Medium charge does 4 points of damage to the C.E.O. This charge is the ideal one to use, as its range is easy to get without overshooting, it doesn't take long to wait for medium charge and does moderate damage. High charge is indicated by the bar turning red, and does 6 damage to the C.E.O. While stronger, the window between this charge and overcharging is very small, so Toons only have a split-second to get this charge. If they overshoot a high charge, the seltzer bottle will overcharge |
+ | The seltzer bottle has three charges; low, medium and high. Low charge is indicated by the bar at the bottom being a light blue. When hit by a low charge, the C.E.O. will only take 2 points of damage. When the bar is yellow, the charge is medium. Medium charge does 4 points of damage to the C.E.O.. This charge is the ideal one to use, as its range is easy to get without overshooting, it doesn't take long to wait for medium charge and does moderate damage. High charge is indicated by the bar turning red, and does 6 damage to the C.E.O.. While stronger, the window between this charge and overcharging is very small, so Toons only have a split-second to get this charge. If they overshoot a high charge, the seltzer bottle will overcharge and will not fire at all, meaning the Toon will have to recharge the seltzer bottle. |
| ⚫ | Toons can take damage from the C.E.O. if they bump into him. He can also damage Toons by running over them while they are on a table. If he does this, the Toon will be flattened, alongside the table, rendering it unusable for a short period of time. The Toon is unable to move until the C.E.O. moves off of them, at which point they will pop back up in a couple seconds. |
||
| ⚫ | |||
| ⚫ | *'''Fore |
||
| − | *'''Throw Gears''' - The C.E.O. throws small projectile gears at the Toons as if they were shurikens. |
||
| − | *'''Swinging''' - The C.E.O. swings his club at a nearby Toon and fires smaller golf balls in a stream towards the Toon. |
||
| ⚫ | All of these attacks will aim towards where the Toon was when he threw the attack. |
||
| ⚫ | When the C.E.O. is defeated, he will spin around rapidly and confirm [[The Chairman]]'s unhappiness of the situation, at which point he will then demote to a [[Flunky]]. Toons will dance in celebration of their victory, and their [[Gags|gag]] experience and [[ToonTask]] progress (if any) will be tallied up. Good ol' Gil Giggles will congratulate the Toons, and award them their [[Pink slip (CEO)|pink slips]], and if the Toon is high enough on their Bossbot Cog Disguise, they earn a laff boost. The Toon will then teleport back to [[Donald's Dock]] after speaking to Good ol' Gil Giggles, concluding the battle. |
||
| ⚫ | |||
| + | ==Attacks== |
||
| − | Unlike the other Cog bosses, the C.E.O. has two "pinch" phases which he can enter should the battle take too long. |
||
| ⚫ | |||
| ⚫ | |||
| ⚫ | *'''[[Swing]]''': The C.E.O. swings his club at a nearby Toon and fires smaller golf balls in a stream towards the Toon. All of these attacks will aim towards where the Toon was when he threw the attack. In other words, if the C.E.O. turns to throws gears at a Toon who is standing by the door to the banquet room and the Toon moves away from the door before the C.E.O. throws the gears, he will still throw them at the door. |
||
| ⚫ | *'''Downsize''' |
||
| + | *'''[[Throw Gears]]''': The C.E.O. will target a Toon and throw a number of gears at them. Toons can move backwards or run in any other direction away from the gears to avoid taking damage. |
||
| ⚫ | *'''[[Fore]]''': The C.E.O. grabs a golf club and swipes with it, causing waves of giant, semi-transparent golf balls to be shot around him in a pattern, each targeting a Toon. Those who are using the seltzer bottles or the golf balls can avoid this attack by exiting out. Others can dodge by simply moving backwards or running in any other direction away from the C.E.O.'s golf balls. |
||
| + | *'''[[Bump (Cog boss)|Bump]]''': The Toon loses a significant amount of laff points when bumping into the C.E.O.'s undercarriage. |
||
| + | Should the battle take too long, the C.E.O. can also initiate two "pinch" phases where his above attacks then become much stronger. |
||
| ⚫ | When the C.E.O is defeated |
||
| ⚫ | |||
| ⚫ | *'''Downsize''': This phase is initiated 30 minutes after the round starts, and is indicated by the C.E.O. saying "Now let's downsize.", from which point he will deal 30+ damage and destroy another conveyor belt. Toons will no longer be able to provide Toon-up for themselves beyond this point without the use of a [[Toon-Up]] [[unite]]. This phase is visible through his golf club, which will change from bright green to red. |
||
| − | == |
+ | ==Tier system== |
| ⚫ | Like the [[Chief Justice]], the C.E.O. boss battle works on a tier system. Depending on the average level of the Toons' [[Cog Disguise]]s entering the battle, the amount of pink slips awarded and the number and type of Cogs seated during the second round may vary. The average is worked out via the following formula: |
||
| − | ''Note: This part gets a little technical, and may be hard to understand for some people.'' |
||
| ⚫ | |||
| ⚫ | |||
| ⚫ | |||
| ⚫ | |||
| ⚫ | |||
| ⚫ | |||
| ⚫ | The Cog value depends on the disguise, but this is not simply determined by level. Each disguise and level have their own unique value. The value can be easily determined via ''n + 1'', where ''n'' is how many promotions a Toon has had totally. For example, a level 1 Flunky has a value of 1. If one were to go from level 1 Flunky to [[Level 3 Cogs|level three]] [[Yesman]], they would require a total of 10 promotions. This amount is added on to the value of 1, resulting in a value of 11, which is that of level three Yesman. |
||
| ⚫ | |||
| ⚫ | |||
| ⚫ | |||
| ⚫ | |||
| ⚫ | The Cog value depends on the |
||
| ⚫ | *Tier 1: This tier is chosen if the average Cog level is between and including a level one Flunky, and a [[Level 4 Cogs|level four]] [[Micromanager]] (a Cog Disguise value of 16). All Cogs in this tier are level 11 Corporate Raiders. There are eight tables, with four Cogs seated per table, resulting in a total of 32 Cogs. One pink slip is awarded in this tier. |
||
| ⚫ | *Tier 2: This tier is chosen if the average Cog level is between and including a [[Level 5 Cogs|level five]] Micromanager (a Cog Disguise value of 17) and a [[Level 8 Cogs|level eight]] Corporate Raider (a Cog Disguise value of 32). All Cogs in this tier are level 12 The Big Cheeses. There are nine tables, with five Cogs seated per table, resulting in a total of 45 Cogs. Two pink slips are awarded in this tier. |
||
| ⚫ | *Tier 3: This tier is chosen if the average Cog level is between, and including a level nine Corporate Raider (a Cog Disguise value of 33) and a level 19 The Big Cheese (a Cog Disguise value of 47). All Cogs in this tier are level 11 Corporate Raiders. There are ten tables, with six Cogs seated per table, resulting in a total of 60 Cogs. Three pink slips are awarded in this tier. |
||
| ⚫ | *Tier 4: This tier is chosen if the average Cog level is between, and including The Big Cheese being level 20 (a Cog Disguise value of 48) or level 34 (a Cog Disguise value of 62). All Cogs in this tier are level 12 The Big Cheeses. There are eight tables, with eight Cogs seated per table, resulting in a total of 64 Cogs. Four pink slips are awarded in this tier. |
||
| ⚫ | *Tier 5: This tier is chosen if the average Cog level is a level 35+ The Big Cheese (a Cog Disguise value of 65+). All Cogs in this tier are level 12 The Big Cheeses. There are thirteen tables, with five Cogs seated per table, resulting in a total of 65 Cogs. Five pink slips are awarded in this tier. |
||
| + | ==Name of origin== |
||
| ⚫ | |||
| ⚫ | |||
| ⚫ | * |
||
| ⚫ | * |
||
| ⚫ | * |
||
| ⚫ | * |
||
| ⚫ | |||
| − | == |
+ | ==Trading card== |
| + | {{Trading card |
||
| ⚫ | |||
| + | |type = Cog |
||
| + | |name = C.E.O. |
||
| + | |quote = "Fore!" |
||
| + | |image = CEO-card-front.jpg |
||
| + | |image2 = CEO-card-back.png |
||
| + | |info = With his high-class banquets and record-breaking time spent on the golf course, the C.E.O. is notorious for playing hard ball. He expects big swings from the Cogs each and every quarter to land a hole-in-one on his profit margins, and won't tolerate any performance less than under par. He may have climbed the corporate ladder, but that hasn't stopped Toons from tabling his banquets and seizing his pink slips. The Chairman certainly doesn't like that! |
||
| + | |||
| + | '''Likes:''' Holes-In-One, Climbing Ladders<br>'''Dislikes:''' Toons, Seltzer Water |
||
| + | }} |
||
==Trivia== |
==Trivia== |
||
| ⚫ | |||
| − | *The C.E.O. is |
+ | *The C.E.O. is currently the strongest Cog in all of [[Toontown (world)|Toontown]]. |
| − | *When the C.E.O. is defeated, he is demoted to a [[Flunky]] and then a new Cog is promoted to take his place. |
||
| + | *The C.E.O. is the only boss battle where: |
||
| − | *The CEO was originally supposed to be on a golf cart in ''Toontown Online'', but the idea was scrapped from development. |
||
| + | **Toons do not meet the boss immediately after entering the area through the elevator. |
||
| ⚫ | |||
| + | **it has the most rounds out of all boss battles with a total of four, whereas the Vice President and the Chief Justice have three, and the Chief Financial Officer has two. |
||
| ⚫ | *In ''Toontown Online'', the golf balls hardly ever |
||
| + | **the Cogs do not come from the boss' undercarriage. |
||
| ⚫ | |||
| + | **the boss can be seen communicating with his Cog associates to discuss various business initiatives, which was introduced by an [[News Blogs (2017)#A Month of Madness|update]] released on May 16, 2017 that implemented new dialogue for the C.E.O. and simple phrases for the Bossbots after receiving their oil cans. |
||
| ⚫ | |||
| + | ***The update unfortunately introduced a terrible bug, causing Toons to gain a distorted view of the game whenever they were run over by the C.E.O.. Toons who witnessed such a scenario entered [[the Grey]], and would not be able to do anything interactive until they log out. This bug had since been fixed in another update released on June 12, 2017. |
||
| − | *The C.E.O. boss battle is the only battle where the Toons do not meet the boss almost immediately after they reach the area where the boss is fought in. The Toons do not meet the C.E.O. until after the first round is completed. |
||
| + | *According to the [[phase files]], there is a file that shows a model of the C.E.O. with a golf cart. The golf cart was never released in ''[[Toontown Online]]''. |
||
| − | *The C.E.O. boss battle has the most rounds out of any boss battle in Toontown, having four rounds as opposed to three for the V.P. and [[C.J.]], and two for the [[C.F.O.]]. |
||
| ⚫ | |||
| − | *The C.E.O. is the only boss that does not produce Cogs from its undercarriage during battle. However, it is unknown whether or not he produces Cogs at all. |
||
| ⚫ | *In ''Toontown Online'', the golf balls were hardly ever effective towards the C.E.O., making many members of the Toontown community believed this was a bug. According to [[Hawkheart]] (Aidan) at [[OMG!Con 2016]], Toons had to spend hours trying to slow the C.E.O. down. It was later discovered by a community member after analyzing ''Toontown Online''<nowiki/>'s code that the C.E.O. had a breakneck recovery rate, resulting in the speed damage becoming ineffective and therefore rendering the golf balls useless.<ref>https://www.youtube.com/watch?v=HjneWVT6tEo</ref> |
||
| ⚫ | |||
| ⚫ | |||
| + | *The C.E.O appears to be rather intelligent, as he will shut off the conveyor belts that Toons use to grab snacks for laff points, if the final battle continues for a long period of time. |
||
| ⚫ | |||
| + | *Because the elevator leading to the C.E.O. boss battle is notably small, some Toons would always clip through the walls in groups of eight. |
||
==Gallery== |
==Gallery== |
||
| − | <gallery> |
+ | <gallery position="center"> |
| + | Chief Executive Officer.png |
||
| − | Pre-Beta CEO vs Hawkheart tumblr n5jcq4fidk1ta3ngoo1 1280.jpg| |
+ | Pre-Beta CEO vs Hawkheart tumblr n5jcq4fidk1ta3ngoo1 1280.jpg|Hawkheart's screenshot of the C.E.O. battle from ''Toontown Rewritten''<nowiki/>'s internal developer server. |
| − | + | CEO golfing.png|A Toon attempting to slow down the Chief Executive Officer through golfing |
|
| − | ttr-screenshot-_4 Man CEO Footage _-Fri-Jun-19-17-10-49-2015-89768.jpg|The CEO's store room (The room before the banquet) |
||
| ⚫ | |||
| − | ttr-screenshot-_CEO Selfie_-Fri-May-08-18-35-36-2015-45609.jpg|The serving round of the CEO, where the Toons put on their waiter disguises |
||
| − | ttr-screenshot- |
+ | ttr-screenshot-_4 Man CEO Footage _-Fri-Jun-19-17-10-49-2015-89768.jpg|The C.E.O.'s kitchen room. |
| − | ttr-screenshot- |
+ | ttr-screenshot-_CEO Selfie_-Fri-May-08-18-35-36-2015-45609.jpg|The serving round of the C.E.O., where the Toons put on their Waiter disguises. |
| − | ttr-screenshot- |
+ | ttr-screenshot-_First CEO _-Mon-May-04-03-09-33-2015-85849.jpg|Toons serving Corporate Raiders at the banquet. |
| − | ttr-screenshot- |
+ | ttr-screenshot-_Flunky close up_-Fri-May-08-18-51-11-2015-74988.jpg|The Flunky that appears after the C.E.O.'s demotion at the end of the boss battle. |
| + | ttr-screenshot-_Flunky Elevator_-Mon-May-04-02-48-44-2015-57259.jpg|The elevator to the banquet kitchen hall. |
||
| + | ttr-screenshot-_Banquet_-Fri-May-20-16-03-56-2016-63643.jpg|The Big Cheeses at the C.E.O.'s banquet. |
||
| + | CEO max slow.png|The notification that appears when a Toon has pelted the C.E.O. with golf balls enough to make him slow as he can go. |
||
| + | ttoff-screenshot-Mon-Mar-16-14-34-45-2020-13362.jpg|An unused doorknob in the door connecting the kitchen to the dining hall. |
||
</gallery> |
</gallery> |
||
| + | |||
| + | ==References== |
||
| + | <references/> |
||
{{Cogs}} |
{{Cogs}} |
||
| Line 103: | Line 128: | ||
[[Category:Special Cogs]] |
[[Category:Special Cogs]] |
||
[[Category:Bosses]] |
[[Category:Bosses]] |
||
| + | [[Category:Bossbot Headquarters]] |
||
Revision as of 04:32, 25 July 2020
| Flunky | |
 | |
| Cog information | |
|---|---|
| Department | Bossbots |
| Attack information | |
| Number of attacks | 4 |
| Lowest damage | 15 |
| Highest damage | 30 |
| Lineage | |
| Preceded by The Big Cheese |
Succeeded by The Chairman |
- "Hrrrmmpph. When I need a job done right... I'll do it myself."
- ―Chief Executive Officer
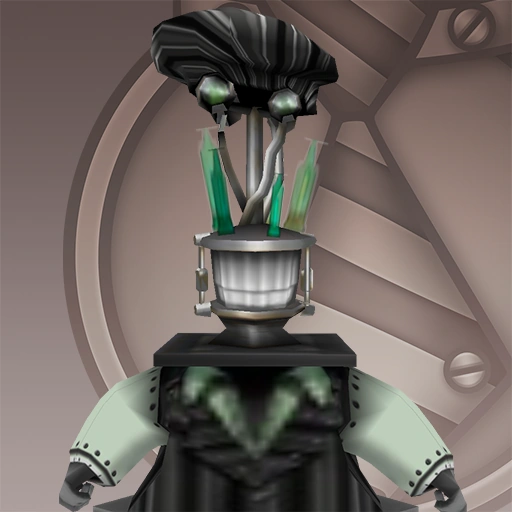
The Chief Executive Officer, more commonly known as the C.E.O., is the boss of the Bossbots. He resides within the Bossbot Clubhouse at Bossbot Headquarters.
Appearance
The C.E.O. possesses a Skelecog-like head and is dressed in a golfer's attire that seems to be bolted to his body. Like the Vice President and the Chief Financial Officer, he sits on a gear-shaped podium and has an undercarriage (except his never seems to open). He has two sets of eyes and teeth on the left side and on the right side, which is hard to see since he does not have an actual head. Instead, light bulbs and jaws stick out of his neck, some of which resemble golfing clubs.
Battle
The C.E.O. boss battle begins with the introduction of Good ol' Gil Giggles, who explains to the incoming Toons that the C.E.O. is hosting a banquet at the time of their arrival, and that the banquet needs to be infiltrated. To do so, however, Toons are in need of waiter suits. Good ol' Gil Giggles explains that Toons need to collect waiter suit parts by defeating the Cogs.
First round: Waiter Cog battle
The first round consists of waiter-suited Version 2.0 Cogs; every Cog fought in this battle (with the exception of the C.E.O. himself) is a Version 2.0 Cog. The Toons in the battle face off against thirty Cogs collectively, with two separate groups of four Toons contributing to the amount of Cogs defeated. The Cogs in this round range from level 9 to level 12, so Cogs in the round can spawn as either a Downsizer, a Head Hunter, a Corporate Raider, or a Big Cheese.
Assuming every participating Toon is in possession of Sound, a good strategy to follow in this round is to allow each individual Toon of the group to use one Foghorn combined with three Elephant Trunks being used by the other Toons. The Toon that starts off with a Foghorn at the beginning of the battle is usually on the far left of the player's computer screen, and then continue from left to right. This is good for preserving Sound, as Toons will run out of Sound very quickly if they use 2 or 3 Foghorns (depending on the level of Cogs they are facing). Once all of the Cogs are defeated, the Toons merge into their waiter suits. The C.E.O. comes in from the banquet room and tells the Toons to get a move on. The Toons then move into the banquet room, and the second round begins.
Second round: Feeding

Oil can
The second round consists of a large banquet room with tables in which Cogs are seated. The Cogs seated at these tables can either be Corporate Raiders or Big Cheeses, depending on the Toons' Bossbot Cog Disguises (see section "Tier system"). Toons are given 300 seconds (five minutes) to defeat all of the Cogs that are seated. To do this, Toons must pick up oil cans carried into the room by conveyor belts that are at the side. These oil cans are supplied by Good ol' Gil Giggles, and will cause a Cog to explode after successfully eating three oil cans. Toons pick the oil cans up by bumping into them whilst they are on the conveyor belt. Then, they are given to the Cog by bumping into any seated Cog that isn't currently eating. An oil can icon appears above a Cog's head to signify their current state of eating, along with a dark line indicating how close they are to finishing.
Once a Cog finishes eating an oil can, they will become hungry once more. When a Cog is hungry, a pink stomach icon will appear above their head, with a dark line indicating how close they are to becoming enraged, as well as the Cog waving their hand in the air. If they are not fed in time, they will become enraged. When they are enraged, they will require another three oil cans to destroy them, regardless of how many oil cans they were fed before. An angry Cog can be distinguished by the yellow lightning bolt above their forehead, as well as the Cog visibly pounding the table in frustration. When a Cog has successfully been fed enough times, they will leap into the air and explode, like they normally do in a battle. Regardless of whether all Cogs were destroyed or not, this round will automatically end once five minutes have passed, starting the third round.
Third round: Banquet battle
The length of the banquet battle depends on how many Cogs are left over from the feeding round. The round starts with both groups facing off against a single level 12 Version 2.0 Big Cheese. Once this Cog is defeated, two things may occur; if all Cogs were destroyed in the feeding round, the fourth round will begin instantly. If there are still Cogs remaining from the feeding round, they will fly in, and Toons will have to battle them as well. This puts more emphasis on taking out Cogs as quickly as possible in the feeding round, as Toons will be short on gags by this point, making this round tougher to deal with without the aid of restock SOS cards and unites. Once all Cogs defeated, the fourth round will then begin.
Fourth round: C.E.O. battle
The final round consists of the battle against the C.E.O. himself, who insists that he needs to fight for himself if he wants a job done. The Toons battle against the C.E.O. with use of seltzer bottles placed on the tables that Cogs were once seated at. If a Toon runs into a table, they will jump onto it, unless it is already occupied by another Toon, or is flattened due to the C.E.O. running over it. When on a table, holding control will build up the power of the seltzer bottle.
The seltzer bottle has three charges; low, medium and high. Low charge is indicated by the bar at the bottom being a light blue. When hit by a low charge, the C.E.O. will only take 2 points of damage. When the bar is yellow, the charge is medium. Medium charge does 4 points of damage to the C.E.O.. This charge is the ideal one to use, as its range is easy to get without overshooting, it doesn't take long to wait for medium charge and does moderate damage. High charge is indicated by the bar turning red, and does 6 damage to the C.E.O.. While stronger, the window between this charge and overcharging is very small, so Toons only have a split-second to get this charge. If they overshoot a high charge, the seltzer bottle will overcharge and will not fire at all, meaning the Toon will have to recharge the seltzer bottle.
Toons can take damage from the C.E.O. if they bump into him. He can also damage Toons by running over them while they are on a table. If he does this, the Toon will be flattened, alongside the table, rendering it unusable for a short period of time. The Toon is unable to move until the C.E.O. moves off of them, at which point they will pop back up in a couple seconds.
When the C.E.O. is defeated, he will spin around rapidly and confirm The Chairman's unhappiness of the situation, at which point he will then demote to a Flunky. Toons will dance in celebration of their victory, and their gag experience and ToonTask progress (if any) will be tallied up. Good ol' Gil Giggles will congratulate the Toons, and award them their pink slips, and if the Toon is high enough on their Bossbot Cog Disguise, they earn a laff boost. The Toon will then teleport back to Donald's Dock after speaking to Good ol' Gil Giggles, concluding the battle.
Attacks
The C.E.O. has a wide array of attacks that are heavily based on golf, all of which can be very deadly if underestimated:
- Swing: The C.E.O. swings his club at a nearby Toon and fires smaller golf balls in a stream towards the Toon. All of these attacks will aim towards where the Toon was when he threw the attack. In other words, if the C.E.O. turns to throws gears at a Toon who is standing by the door to the banquet room and the Toon moves away from the door before the C.E.O. throws the gears, he will still throw them at the door.
- Throw Gears: The C.E.O. will target a Toon and throw a number of gears at them. Toons can move backwards or run in any other direction away from the gears to avoid taking damage.
- Fore: The C.E.O. grabs a golf club and swipes with it, causing waves of giant, semi-transparent golf balls to be shot around him in a pattern, each targeting a Toon. Those who are using the seltzer bottles or the golf balls can avoid this attack by exiting out. Others can dodge by simply moving backwards or running in any other direction away from the C.E.O.'s golf balls.
- Bump: The Toon loses a significant amount of laff points when bumping into the C.E.O.'s undercarriage.
Should the battle take too long, the C.E.O. can also initiate two "pinch" phases where his above attacks then become much stronger.
- Reorganize: This phase is initiated 20 minutes after the round starts, and is indicated by the C.E.O. saying "It's time to reorganize.", which allows him to deal 19 damage and destroy one conveyor belt. This is visible through his golf club as well, which will turn a bright green color.
- Downsize: This phase is initiated 30 minutes after the round starts, and is indicated by the C.E.O. saying "Now let's downsize.", from which point he will deal 30+ damage and destroy another conveyor belt. Toons will no longer be able to provide Toon-up for themselves beyond this point without the use of a Toon-Up unite. This phase is visible through his golf club, which will change from bright green to red.
Tier system
Like the Chief Justice, the C.E.O. boss battle works on a tier system. Depending on the average level of the Toons' Cog Disguises entering the battle, the amount of pink slips awarded and the number and type of Cogs seated during the second round may vary. The average is worked out via the following formula:
- The level of Cog Disguises going into the battle ÷ The number of Toons in the battle
For example; if eight level 1 Flunkies enter the battle, the outcome average will be level 1, since the data from this would be
- 1 + 1 + 1 + 1 + 1 + 1 + 1 + 1 ÷ 8
This equation results in 1 being the answer, which is the identifier for a level one Flunky-tier C.E.O.
The Cog value depends on the disguise, but this is not simply determined by level. Each disguise and level have their own unique value. The value can be easily determined via n + 1, where n is how many promotions a Toon has had totally. For example, a level 1 Flunky has a value of 1. If one were to go from level 1 Flunky to level three Yesman, they would require a total of 10 promotions. This amount is added on to the value of 1, resulting in a value of 11, which is that of level three Yesman.
The C.E.O. battle has five tiers, all of which affect how the banquet room is laid out.
- Tier 1: This tier is chosen if the average Cog level is between and including a level one Flunky, and a level four Micromanager (a Cog Disguise value of 16). All Cogs in this tier are level 11 Corporate Raiders. There are eight tables, with four Cogs seated per table, resulting in a total of 32 Cogs. One pink slip is awarded in this tier.
- Tier 2: This tier is chosen if the average Cog level is between and including a level five Micromanager (a Cog Disguise value of 17) and a level eight Corporate Raider (a Cog Disguise value of 32). All Cogs in this tier are level 12 The Big Cheeses. There are nine tables, with five Cogs seated per table, resulting in a total of 45 Cogs. Two pink slips are awarded in this tier.
- Tier 3: This tier is chosen if the average Cog level is between, and including a level nine Corporate Raider (a Cog Disguise value of 33) and a level 19 The Big Cheese (a Cog Disguise value of 47). All Cogs in this tier are level 11 Corporate Raiders. There are ten tables, with six Cogs seated per table, resulting in a total of 60 Cogs. Three pink slips are awarded in this tier.
- Tier 4: This tier is chosen if the average Cog level is between, and including The Big Cheese being level 20 (a Cog Disguise value of 48) or level 34 (a Cog Disguise value of 62). All Cogs in this tier are level 12 The Big Cheeses. There are eight tables, with eight Cogs seated per table, resulting in a total of 64 Cogs. Four pink slips are awarded in this tier.
- Tier 5: This tier is chosen if the average Cog level is a level 35+ The Big Cheese (a Cog Disguise value of 65+). All Cogs in this tier are level 12 The Big Cheeses. There are thirteen tables, with five Cogs seated per table, resulting in a total of 65 Cogs. Five pink slips are awarded in this tier.
Name of origin
The "Chief Executive Officer" is the position of the most senior corporate officer (executive) or administrator in charge of managing a for-profit organization.
Trading card
Template:Trading card
Trivia
- The C.E.O. was the final boss to be released to Toontown Rewritten after members of the Toontown community managed to discover the secret coordinates leading to Bossbot Headquarters as part of an ARG.
- The C.E.O. is currently the strongest Cog in all of Toontown.
- The C.E.O. is the only boss battle where:
- Toons do not meet the boss immediately after entering the area through the elevator.
- it has the most rounds out of all boss battles with a total of four, whereas the Vice President and the Chief Justice have three, and the Chief Financial Officer has two.
- the Cogs do not come from the boss' undercarriage.
- the boss can be seen communicating with his Cog associates to discuss various business initiatives, which was introduced by an update released on May 16, 2017 that implemented new dialogue for the C.E.O. and simple phrases for the Bossbots after receiving their oil cans.
- The update unfortunately introduced a terrible bug, causing Toons to gain a distorted view of the game whenever they were run over by the C.E.O.. Toons who witnessed such a scenario entered the Grey, and would not be able to do anything interactive until they log out. This bug had since been fixed in another update released on June 12, 2017.
- According to the phase files, there is a file that shows a model of the C.E.O. with a golf cart. The golf cart was never released in Toontown Online.
- An oversized golf cart was mentioned in a blog post foreshadowing the release of Bossbot Headquarters, in which Team LHAAFBBHQ was shown a large crate found by Whispering Willow that contained parts for the golf cart.
- In Toontown Online, the golf balls were hardly ever effective towards the C.E.O., making many members of the Toontown community believed this was a bug. According to Hawkheart (Aidan) at OMG!Con 2016, Toons had to spend hours trying to slow the C.E.O. down. It was later discovered by a community member after analyzing Toontown Online's code that the C.E.O. had a breakneck recovery rate, resulting in the speed damage becoming ineffective and therefore rendering the golf balls useless.[1]
- The cutscenes of the entire C.E.O. battle were tweaked with revisions being made to all of Good ol' Gil Giggles's speeches and two of the C.E.O.'s speeches, and a brand new animation where the C.E.O. spins around after being defeated.
- The C.E.O appears to be rather intelligent, as he will shut off the conveyor belts that Toons use to grab snacks for laff points, if the final battle continues for a long period of time.
- Due to Version 2.0 Cogs exploding into Skelecogs when their outer shell is destroyed, this is the only place where Downsizer Skelecogs can be found outside of a Mega-Invasion.
- Because the elevator leading to the C.E.O. boss battle is notably small, some Toons would always clip through the walls in groups of eight.